This page describes the end of year processes to be completed by admins to remove existing student accounts and roster new student accounts. This process varies based on setup method. Please click on your existing setup method to view end of year instructions:
1. School/District Workflow Setup
3. LTI Integration Setup / Access Code Setup
1. School/District Workflow Setup
- **If teachers want to retain student assessment data, please have teachers export that assessment data prior to you removing student accounts. Once a student is deleted, the homework and assessment data will also be deleted. How to view/export assessment data reports, How to export homework scores
- **If you have been set up as a district in our portal (these district setups are rare), you'll need to complete these steps for each school in your account. Please reach out to us if you have any questions about this.
- Admins: Please refer to our School Admin Setup FAQ if you need more information on general account setup instructions.
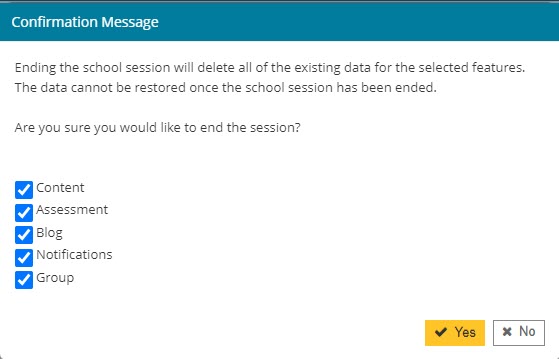
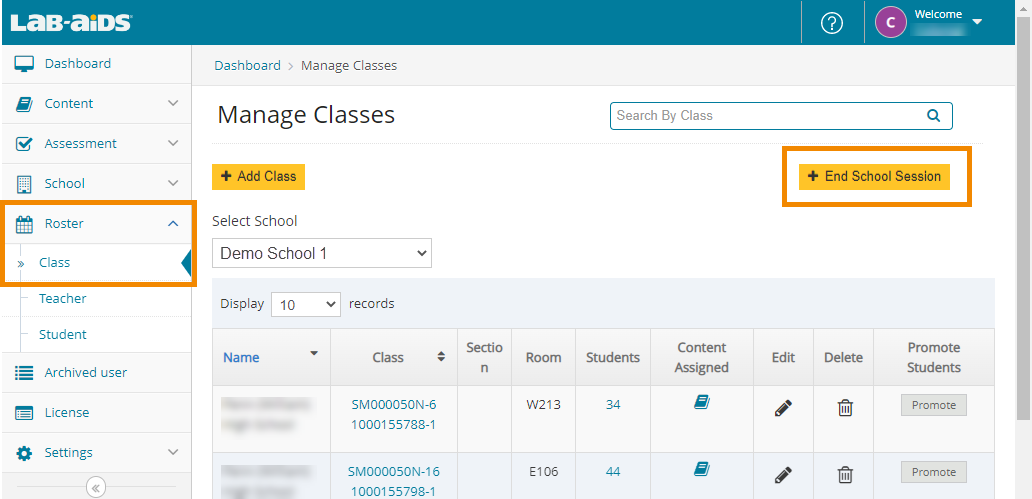
1. Admin clicks "End School Session".
- Go to Roster > Class > End School Session
- This option removes licenses from student accounts so they can be reassigned to other students. It can also remove other data, depending on which options are selected.
- This does not remove student accounts.
- After clicking "End School Session", a popup will appear with options to select:
- At minimum, ensure "Content" is selected, since that option will remove licenses from students.
- "Assessment" will delete old student assessment scores/data.
- "Blog" will not do anything since that feature has been removed.
- "Notifications" will remove any existing notifications in user accounts.
- "Group" will delete any existing Groups created by teachers.

Clever/Classlink/Google Classroom districts: The below instructions do not apply to you. Please skip to the correct section for instructions specific to your rostering method.
2. Admin deletes existing student accounts
- Select Roster > Class. Click on a Class name from the list shown. Select “Display 100 Records”, click checkbox to the left of “Name” column to select students 100 at a time, then select Delete.
- Repeat for each Class until all students are deleted.

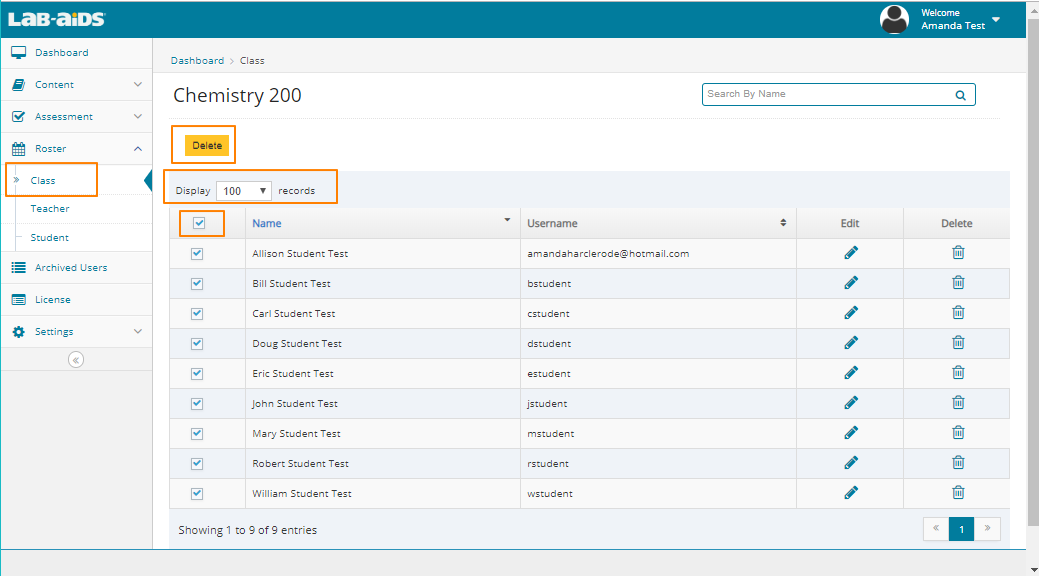
If you have a large quantity of students/classes and it is not realistic to delete students using this method, please contact us at portals@lab-aids.com.
3. Admin verifies class/teacher rostering information
A. Admin verifies class names are updated and accurate for next school year
- Roster > Class
- Click "Add Class" to add class titles manually
- Click "Bulk Upload" to add class titles in bulk
- Make sure all necessary class titles are added / old classes are removed
B. Admin verifies that all teachers are entered correctly into the system and associated to correct classes
- Roster > Teachers
- Verify new teachers are added ("Add Teacher" button)
- Verify old teachers are removed ("Delete" icon next to teacher's name)
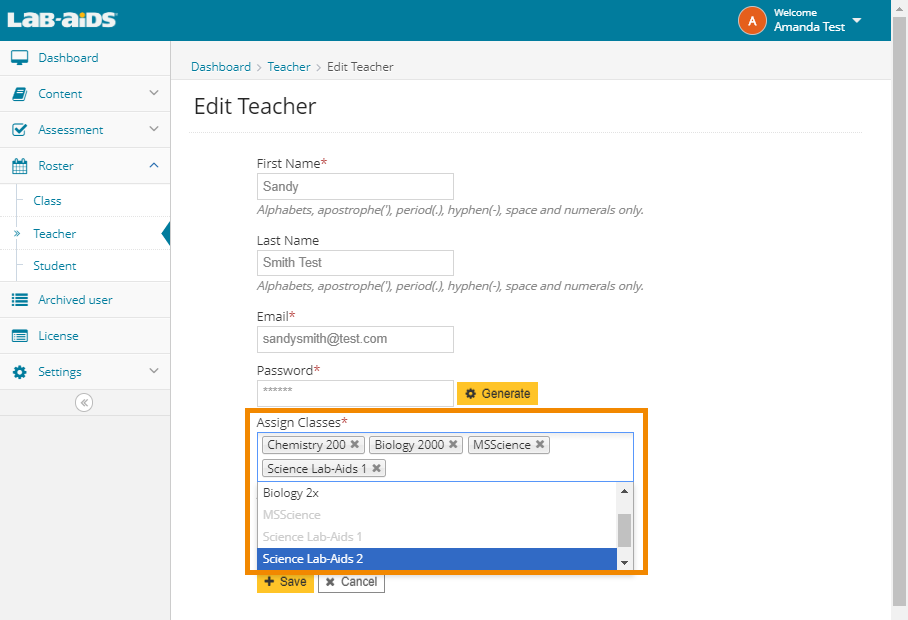
- Verify teachers are assigned to the correct classes ("Edit" button next to teacher's name)
- To update teachers' classes via bulk update, click here.
- To update teachers' classes manually, click the "Edit" button next to the teacher's name, and then click in the "Assign Classes" box. The class list will appear, and you can select/deselect classes to be assigned to the teacher. Use the CTRL button to select/deselect multiple classes.
4. Admin confirms that POs have accurately been assigned to teachers
- How to assign POs to teachers
- Unassign teachers from POs if they no longer need access.
- Assign teachers to POs as necessary for new teachers or new POs
- If you have both a student PO and a teacher PO for the same set of content, you need to assign both POs to teachers teaching that content to their students.
5. Admin rosters student accounts (this should be similar to last year)
- Please see this document for more detailed steps on Rostering Students.
- Admin creates and uploads “bulk upload” student document: Roster > Student > Bulk Upload
6. Admin communicates to teachers how to assign books to their students
- How teachers assign books to students
- Students will not see content unless teachers do this.
2. Google Classroom Setup
Once district class rosters have been updated in Google Classroom for the new school year:
1) Admins: Select End School Session to gain back licenses from students. This important step will prevent last year's students from taking up licenses that are meant for this year's students.
- From Roster > Class, select End School Session from the top-right corner.
- This will unassign all licenses that were assigned to student accounts last school year.
- This will allow your account to gain those licenses back so that teachers can then assign them to new classes/students.
2) Teachers: Update class sync selections:
- Teachers log into their Lab-Aids portal account. Wait for the automatic sync to finish, then click on Settings > Google Classroom v2, and click "Start Sync" or "Edit". Select/deselect classes to sync and proceed through each page.
- The newly selected classes will now sync each time upon login.
Removing old data: Old class/teacher/student data is not automatically deleted from the account. While old data may "clutter" the account, old data does not cause any functional issues. Lab-Aids is able to delete some data upon request from the district. Deleting old data is optional. This page explains the optional processes for removing old class/teacher/student data from previous years.
3) [Optional] New Teachers: If any new teachers need access, here are the instructions for setting up new teachers in the portal with a GC integration.
4) Admins: Confirm teachers have been assigned the correct POs/transactions (sets of licenses): How to assign POs to teachers
- Unassign teachers from POs/transactions if they no longer need access.
- Assign teachers to all necessary POs/transactions -- for new teachers or new POs. If you district has a separate PO/transaction for student licenses, ensure teachers have been assigned to the student PO/transaction.
5) Teachers need to assign books to students for the new school year.
- Students will not see content unless teachers do this.
Removing old data: Old class/teacher/student data cannot be deleted manually. While old data may "clutter" the account, old data does not cause any functional issues. Deleting old data is optional. This page explains the optional processes for removing old class/teacher/student data from previous years.
For general Google Classroom Integration Setup instructions, you can refer to the Google Classroom Integration Setup Guide.
3. LTI Integration Setup / Access Code Setup
1) Teacher Access Codes:
- Please let Lab-Aids know if any of your teachers no longer need access and need their accounts removed from the teacher access code.
- Communicate the existing access code and redemption instructions to teachers if necessary.
- Teachers only need to redeem this code one time, not once each year.
- However, if any teachers did not redeem this access code last year, you'll need to communicate redemption instructions again.
2) Student Access Codes:
- Please ask Lab-Aids for a new access code for your students for next year. When doing so, please include the following information:
- Would you like all student books on the same student access code, or would you like to split up books by grade and have each grade redeem a different code? If you would like them split up by grade, please list the books (purchased) desired for each grade.
- Would you like Spanish titles included in the access code?
4. Clever/Classlink Setup
1) District Admin clicks End School Session for each school to gain back licenses from students.
- From Roster > Class, choose a school from the dropdown and then select End School Session from the top-right corner.
- This will unassign all licenses that were assigned to student accounts last school year. This does not remove licenses from anyone except students.
- This will allow your account to gain those licenses back so that teachers can then assign them to new classes/students.
- Repeat for each school.

2) Ensure accurate/updated data is being shared with us in Clever/Classlink. Some districts may need to perform a sync reset:
- When rosters are ready, Classlink/Clever admin needs to update data sharing rules in Clever/Classlink so the accurate classes and users are being shared with us.
- New data should sync overnight. If new data does not sync after a few days, there are two options:
- Option 1: Contact portals@lab-aids.com to have Lab-Aids force a manual sync reset.
- Option 2: District admin can force a manual sync reset.
- Clever sync "Reset"
- Classlink "Reset" is similar to Clever "Reset", except go to Settings > OneRoster V2 > Click "Reset".
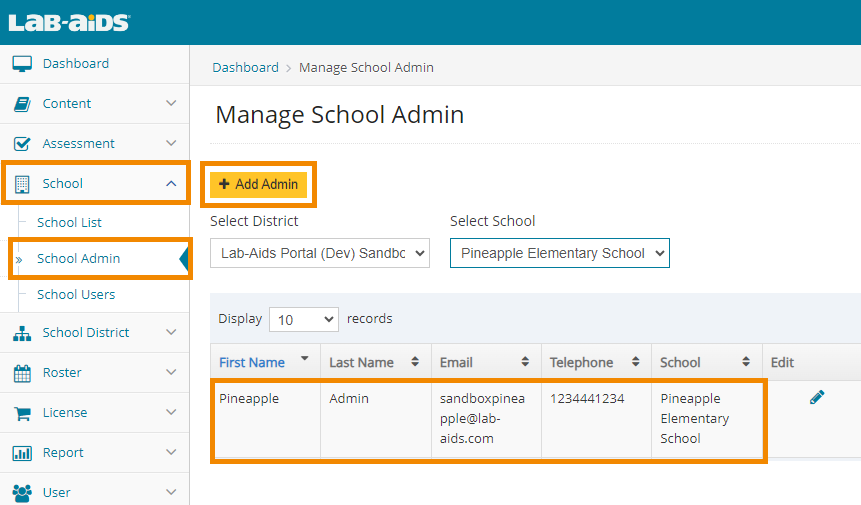
3) Ensure school admins are added for all schools needing access to content. (School > School Admin > Add School Admin).
- The system requires a "school admin" when assigning licenses to each school. School admins usually do not sync from Classlink or Clever, and therefore school admins usually need to be added manually.
- When possible, Lab-Aids adds school admins on behalf of customers. If Lab-Aids is not able to do this, districts can either reach out to Lab-Aids to have school admins added, or district admins can add school admins themselves.
- District admins can add school admins by going to School > School Admin > Add School admin.
- If you do not have a real person to add as a school admin, you may create a fake username using an @lab-aids.com email address. For example, districtnameschoolname@lab-aids.com, thompsonadmin4@lab-aids.com, etc.
4) Ensure the correct schools and teachers have been assigned licenses.
- From the License menu on the left, confirm that licenses are assigned to schools and teachers needing access. Assign licenses to any new teachers and unassign from any teachers no longer needing access. Confirm that the number of licenses assigned to the school is still accurate for the new school year. More instructions:
- Assigning licenses with Clever integration
- Assigning licenses with Classlink integration
5) Remind teachers how to assign books to students
- You can also share the Lab-Aids Portal FAQ page with teachers
Helpful Information for all setup methods:
- When students are deleted, their assessment and homework data is also deleted.
- If you are considering changing setup/rostering methods for next school year, please see our "What rostering methods do you offer?" FAQ for an explanation of each method.
Please contact portals@lab-aids.com with additional questions.