Lab-Aids now offers LTI 1.3 integration with Canvas. This page contains the setup instructions for Canvas Admins:

  1. Canvas Admin provides domain to Lab-Aids
  2. Lab-Aids provides Canvas Admin with instructions
  3. Canvas admin sets up LTI Developer key in Canvas
  4. Canvas admin sends Client ID to Lab-Aids, Lab-Aids inputs Client ID into portal LTI setup
  5. Canvas admin adds Lab-Aids tool to Canvas
  6. Canvas admin tests connection
  7. Canvas admin provides instructions/resources to teachers


1. Canvas Admin will need to provide Lab-Aids with the district's Canvas domain (DOMAIN.instructure.com). 

2. Lab-Aids will provide the Canvas admin with:

  • Instructions to set up a new LTI Developer Key in Canvas
  • Credentials to use when creating the new LTI Developer Key:
    • Lab-Aids "Launch URL" = Redirect URI, Target Link URI fields in Canvas
    • OIDC Login Initiation URL = Open ID Connect Initiation URL field in Canvas
    • Keyset URL Text = Public JWK Text field in Canvas

3. Canvas Admin will set up a new LTI key in the Canvas Admin account using the LTI credentials given by Lab-Aids. Click here for detailed instructions. 

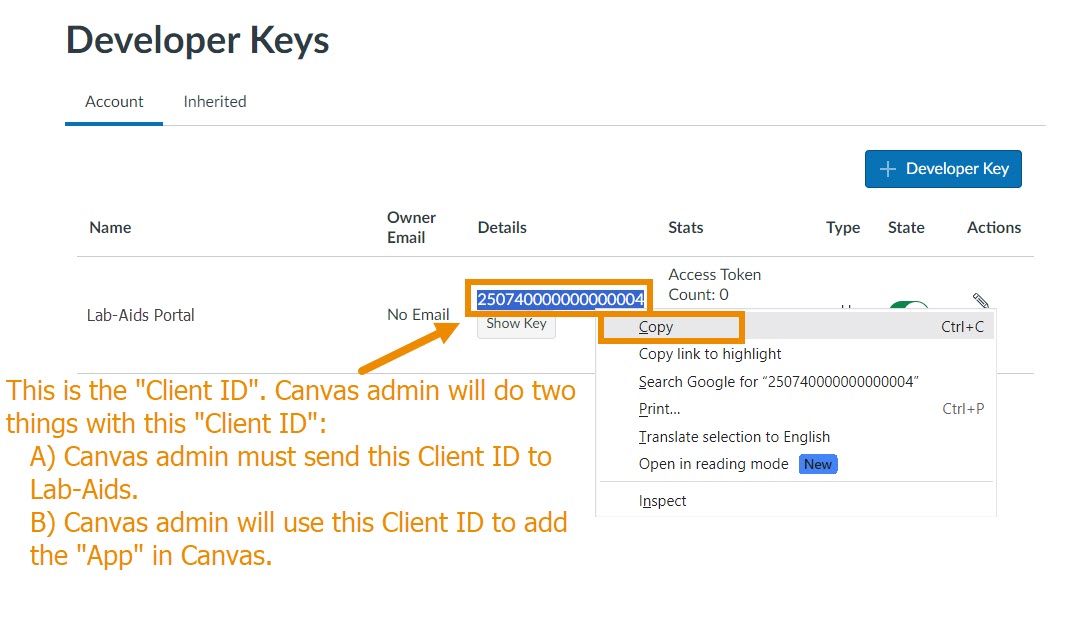
4. Canvas Admin must send the Developer Key's Client ID to Lab-Aids once the new LTI Developer Key is created. This is an important step; the integration will not be successful without this Client ID. 

  • Important: The LTI 1.3 integration tool will not be functional until Lab-Aids confirms the customer's Developer Key "Client ID" has been added into the Lab-Aids Portal LTI Setup. 
  • Lab-Aids will add the district's Client ID in the Lab-Aids platform LTI setup. Lab-Aids will confirm when this has been done.
  • Keep the Client ID handy for the next step. 

From the Developer Keys screen, the "Client ID" is copied so that it can be shared with Lab-Aids and used to add the app to Canvas.

5. Canvas Admin adds the new Lab-Aids external tool/app to Canvas using Client ID.

  • Copy the Client ID via the above steps.
  • Add the Lab-Aids tool as an app by going to Canvas Admin Account >> Settings >> Apps >> View App Configurations >> +App
    • To ensure the app is available for all courses, make sure admin is clicking on "Settings" from the admin/district level and not at the class level. 

A screen with highlighted rectangles showing how admin will add the app in Canvas.

A screen with orange rectangles showing to click "+ App"

  • Choose Client ID for configuration type, paste in the Client ID, and click "Submit".

The "Add App" screen with Configuration Type "By Client ID" highlighted, and text stating to paste "Client ID" into the field.

  • Once this step is completed, the Lab-Aids LTI external tool will be available for teachers to select when creating an assignment with submission type of "External tool".
  • Important: The LTI 1.3 integration tool will not be functional until Lab-Aids confirms the customer's Developer Key "Client ID" has been added into the Lab-Aids Portal LTI Setup. 


6. Once Lab-Aids confirms the Client ID has been added on the Lab-Aids platform, Canvas Admin needs to test the LTI connection from both their admin account and a teacher account. 

Testing from admin account (which will also create Admin account):

  • Canvas Admin should add the new Lab-Aids LTI external tool to a course in Canvas and click on the tool to test the tool's functionality. Admin will be auto-rostered into the account. Admin will not see any teacher/class/student data in the portal account yet since they are the first user to be auto-rostered into the account, but they should check the left-hand menu for a License menu option. This "License" menu would indicate the account is an admin account. 

The left-hand menu is shown with "License" outlined in orange. This "License" menu indicates the account is an admin account.


Testing a demo teacher account:

Add an assignment, choose "external tool" for submission type, search for lab-aids portal external tool. click 'load this tool in new tab".

  • Click on the tool from the demo teacher's account. Teacher should be logged into their account successfully. Teacher should not receive an error or login screen. If there are any issues with this process, contact Lab-Aids at portals@lab-aids.com.

Teacher adds an assignment with submission type of "External tool". Then, teacher clicks on the tool to be logged into their account.

Teacher clicks on the Lab-Aids external tool assignment and should be brought to their account.


7. Once testing is successful, Canvas admin will need to provide instructions and resources to teachers:

  • Teachers will need to add the Lab-Aids tool as an assignment with submission type of "External tool" to each class needing access to Lab-Aids content. Refer to these instructions from Canvas on how to add an assignment using an external app. 
  • Teachers and students will need to click on the tool to be logged into their accounts.
    • Each time a teacher clicks on the tool from a Canvas course, the class title and the students rostered into that class in Canvas will be auto-rostered/synced into the Lab-Aids Portal, including any roster updates. Teacher can check rosters in the Portal by going to the Roster >> Class and Roster >> Student left-hand menus.
    • Teachers will need to click on the Lab-Aids LTI tool from each course in Canvas needing access to the Lab-Aids Portal. Then check Roster >> Class and Roster >> Student menus to confirm rosters have synced.
  • Teachers may need to assign books to students.
  • Resources to share with teachers:
    • Portal Navigation for Teachers: https://www.lab-aids.com/portal-20-basic-navigation-teachers
    • Portal Navigation for Students: https://www.lab-aids.com/portal-20-basic-navigation-students
    • Portal FAQ Page: https://www.lab-aids.com/portal-faq


^Back to top